 S S
To kick off the new section, lets start right from the beginning, with everyone's first customisation technique -
changing the background, using WB-Pattern preferences. For this youll need:
- WinUAE and AmigaInABox working properly on your system, (AIAB setup in 16bit)
- A nice Art package (on your PC) that can load/save in lots of formats - ie: PaintShopPro.
- A snazzy background picture, (preferable a jpeg) that either tiles or fits the whole screen.
|
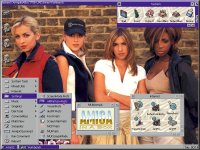
1. Okay, lets get started. The picture im going to use is a scan of All-Saints (the thinking man's Spice Girls)
Its a jpeg in 1024x768, but since I only use my "Amiga" in 800x600, ive scaled it down in PaintShopPro.
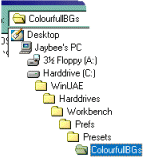
2.1 Now, we need to save the picture. By default, AIAB keeps its background pictures all in one place, so go to save,
and navigate through the directories until you find:
- WinUAE\Harddrives\Workbench\Prefs\Presets\ColourfullBGs\
|
|
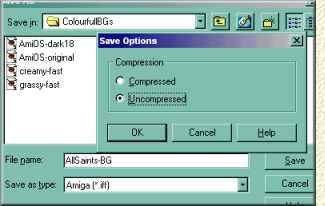
2.2 Although the AIAB Workbench can use gifs and jpegs, its best to use a format that the Amiga can read quickly and
easily. Lets use a 24bit "IFF" uncompressed as the save format. Give your image a suitable name and hit save.
Its best to use 24bit backgrounds as these disaply best on a Picasso96 16bit screen. Also the image will be shown "raw" -
ie: its colours will not get remapped; another speed boost ;)
Now close the art package, and load up your AIAB setup WinUAE. After a few seconds, everthing will
have finished loading and you can change the background.
|
|
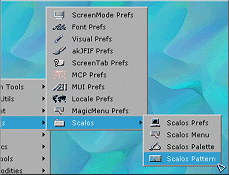
3.1 From the AIAB StartMenu, navigate:
AIAB===> Settings ===> Scalos ===> Scalos Pattern
And a lovely GUI will appear.
|
|
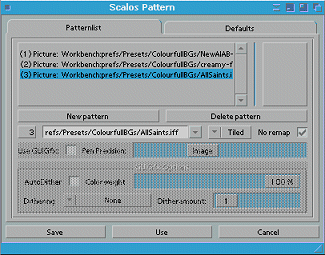
3.2 Click "New Pattern", and using the file-requestor gadget to choose the image you prepared earlier. Next click
and drag the number slider so that it reads '3' (as in the third pattern), finally tick the 'No Remap' option.
3.3
Now select the 'Defaults' page and change the 'Desktop' number slider to read '3'. Finally, click save and your background
will be transformed! Magic!
|
It is also possible to change the texture of Workbench's icon windows. To do this, simply change
the number of the "Windows" setting (on the 'Defaults' page) to your desired pattern ;) Easy!
When you're done press "PrintScreen" to copy a screengrab to the clipboard - then send it to all your
mates, who probably wont give a toss....oh well ;)
|
